I copied this blog post from Matthew Hodgkins Blog located at: [Matthew Hodgkins](https://hodgkins.io/)Once you have your data in Splunk, you often come across situations when you would like to be notified when something happens (or doesn’t).
This is where Splunk alerts come in, where we can get alerts based on search results.
- Getting Splunk setup
- Getting test data
- Alerting basics
- Example 1 - Sending a webhook
- Example 2 - Alerting to Slack
- Example 3 - Alerting to Slack with rich formatting
- Example 4 - Alerting when logs are not appearing (a dead man’s switch)
- General tips
- Conclusion
Getting Splunk setup
The free edition of Splunk allows you to store 500mb/day. You can find a comparison of features here. You can use the free version for these examples.
The easiest way to play around with Splunk is to use Docker. I have setup a repository at https://github.com/MattHodge/splunk which I will keep updated with demo data files as I add more posts.
Make sure you have installed docker-compose.
# Clone the repo
git clone git@github.com:MattHodge/splunk.git

# Enter the docker directory
cd splunk/docker

# Run docker compose to bring up the containers
docker-compose up -d
Once the container comes up, open up a browser and go to http://localhost:8000/.
Enter the username of admin and password of changeme and you will be presented with the first Splunk screen.
Getting test data
Enable a TCP port
If you don’t have a TCP listener enabled:
- Go to Settings > Data Inputs in the Splunk bar
- Go to TCP > New
- Enter a port > Next
- Choose the source type of TCP and optionally set an index
Running a data generator script
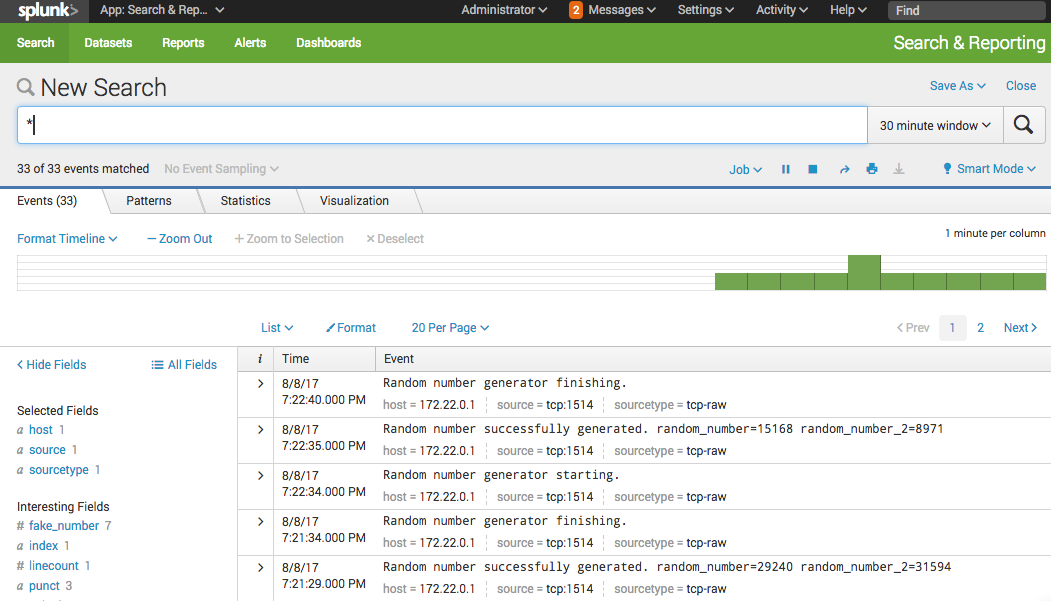
I have created a script in both bash and PowerShell which will send generated data into your Splunk instance via the TCP Listener.
Just change the value of the splunk_tcp_host and splunk_tcp_port variables up the top of the script and then run it.
It will run a loop and send the following logs:
Alerting basics
Alerting in Splunk is quiet simple but powerful.
- To start with, create your search query on something you would like to alert on, for example:
"Random number successfully generated"- Then click on Save > Alert.
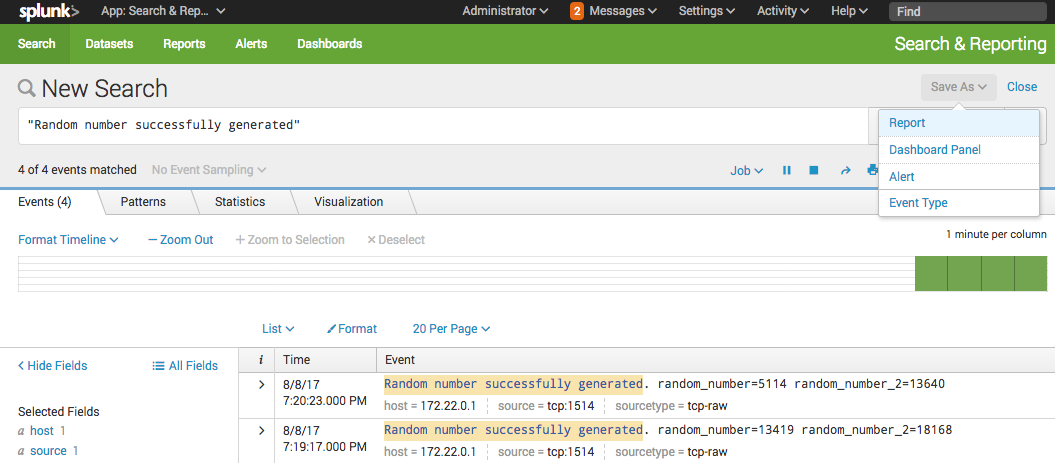
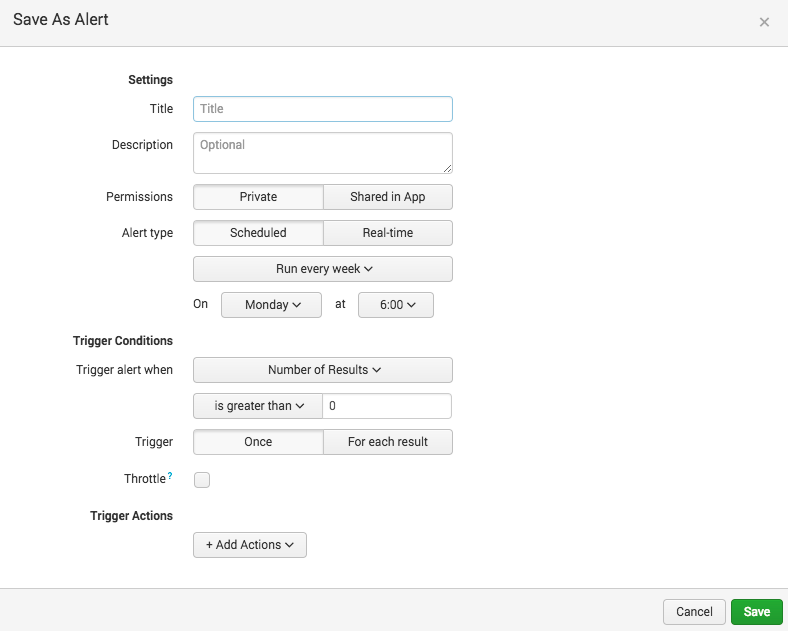
You will then be presented with the Splunk Alert creation dialog where you can customize your alert.
If you want to edit an alert, you can go to the Alert page to edit it.

To edit the search query that the alert is based on, click on Open in search and once you save the query you will be able to click Save to save it back to the alert.
Cron scheduling
Splunk alerts support several schedules including hourly or daily, but you can also use a cron expression.
If you are unfamiliar with cron expressions, you can read up about them here.
A nice way to validate your expression is to use crontab.guru.
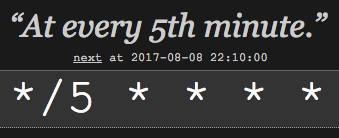
As an example, to have an alert run its search every 5 minutes, this would be the cron expression:
*/5 * * * *We can validate this on crontab.guru:
Example 1 - Sending a webhook
As our first basic example, let’s send a webhook every time our random number generator finishes. You could use a webhook to notify a custom application of alert occurring.
The reason we are starting with a webhook is that it provides is a nice way to confirm our alarms are working as expected. We can use https://webhook.site to view the webhook being called, and see the type of data Splunk is sending.
- Do a search for
Random number generator finishing. - Click Save As > Alert
- Provide the name
Webhook - Choose Run on Cron Schedule. As our random number generate runs every 60 seconds, we will also run an alert every 60 seconds. In cron format, this is
* * * * *, so enter this as the Cron Expression. - For Time Range, we only want to search back for logs in the last 60 seconds, so choose a relative schedule for
1 minute ago - Choose Number of results and is greater than
0 - We will also choose to Trigger for each result
- Drop down Add Action and choose webhook
We will now need to grab our webhook URL from https://webhook.site. When you load the page you will be provided a unique webhook URL to use:

- Copy the URL and enter it as the webhook URL in the Splunk alert
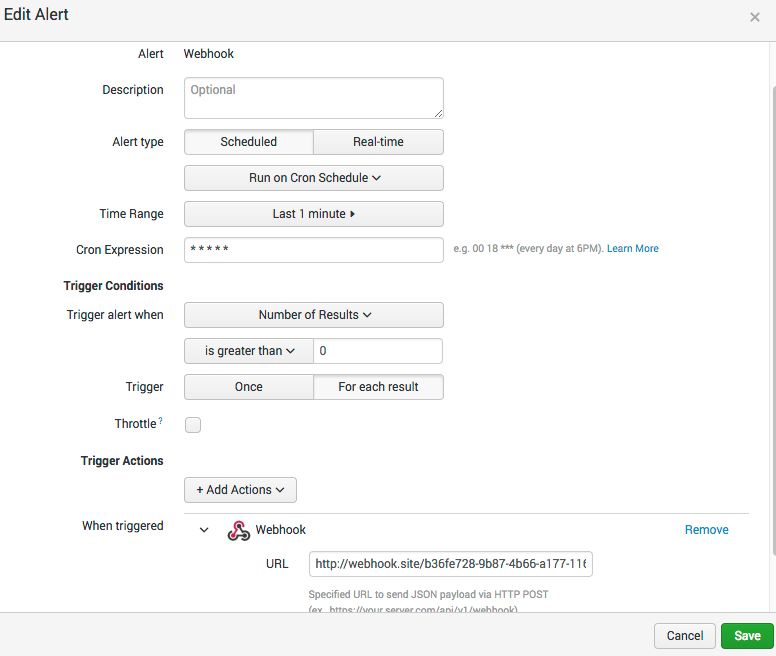
You should have an alert that looks something like this:
- Click Save
In summary, we have created an alert that runs its search every 60 seconds, over the last 60 seconds of logs, and then send a payload to the webhook every time it sees a log message containing Random number generator finishing..
Switch back over to the https://webhook.site site, and you should see some requests coming in.

If you inspect the JSON object that is sent with the webhook, you will see something like this:
{
  "results_link": "http://splunkenterprise:8000/app/search/search?q=%7Cloadjob%20scheduler__admi...",
  "search_name": "Webhook",
  "owner": "admin",
  "result": {
    "_si": [
      "splunkenterprise",
      "main"
    ],
    "index": "main",
    "_time": "1502225046",
    "_kv": "1",
    "_eventtype_color": "",
    "eventtype": "",
    "sourcetype": "tcp-raw",
    "host": "172.22.0.1",
    "_sourcetype": "tcp-raw",
    "splunk_server_group": "",
    "_raw": "Random number generator finishing.",
    "_bkt": "main~3~2A647A01-D269-4A61-A6EF-48E96D0B36A5",
    "source": "tcp:1514",
    "timestamp": "none",
    "splunk_server": "splunkenterprise",
    "_indextime": "1502225046",
    "punct": "___.",
    "_cd": "3:677",
    "_serial": "0",
    "linecount": "1"
  },
  "sid": "scheduler__admin__search__Webhook_at_1502225100_32",
  "app": "search"
}
You will get the alert pushed to the webhook every time the Splunk alert is triggered.
Example 2 - Alerting to Slack
Now we have seen that our alerts are working, let’s setup alerting to a Slack channel. The easiest way to get this working is to use the Splunk Alert addon.
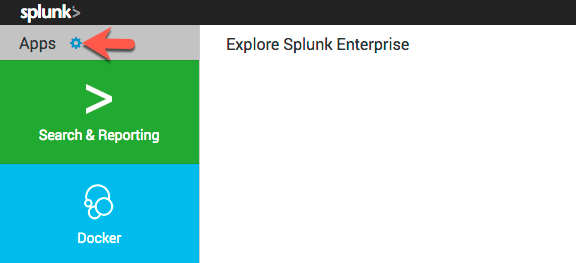
- Click the cog to manage Apps
- Click on Browse More Apps > Search for
Slack Notification Alert> Click Install (you will need a Splunk.com account to install apps)
We now need to grab our Slack Webhook URL so Splunk can send alerts to it. You can do this in Slack by adding a Custom Integration
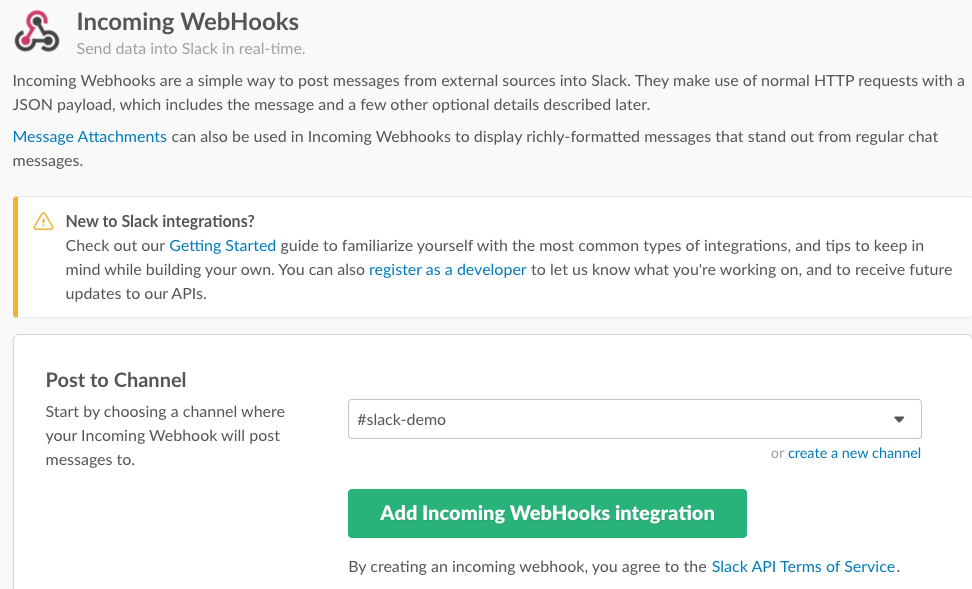
Copy the webhook URL which should look something like https://hooks.slack.com/services/XXXXX/XXX/XXXXXX.
- Go back to Slack and choose the cog to manage your Apps, and you will see
Slack Notification Alertin the list - Click on Set up for the addon

- On this screen, paste in the a Slack webhook URL > click Save
We are now ready to create our alert.
- We will edit our existing alert called
Webhookalert and add the additional Slack notification.
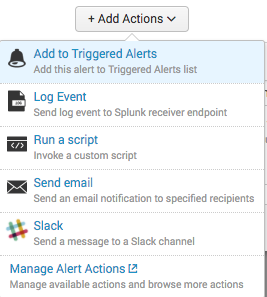
- Enter in the Channel and a Message. I am using
Random number generator finished!as my alert message. Click Save when done.
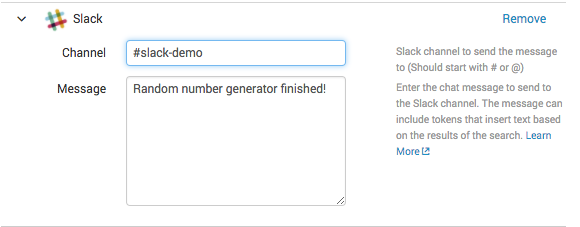
Next time the alert is triggered, you should see it appearing in your Slack channel.
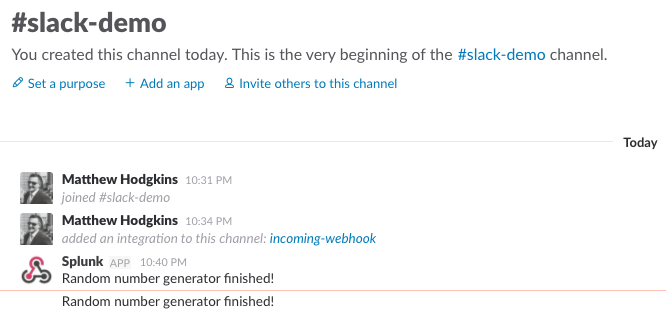
Example 3 - Alerting to Slack with rich formatting
What if we want to use some of the data from the log we are alerting on, and use that inside the message to Slack? Splunk makes this pretty easy.
As an example, let’s extract some data out of the following log entry:
Random number successfully generated. random_number=15436 random_number_2=8389I want to send to Slack the values for random_number and random_number_2.
- Create a search for
Random number successfully generated.and save it as an alert - Schedule the alert as described in the previous examples
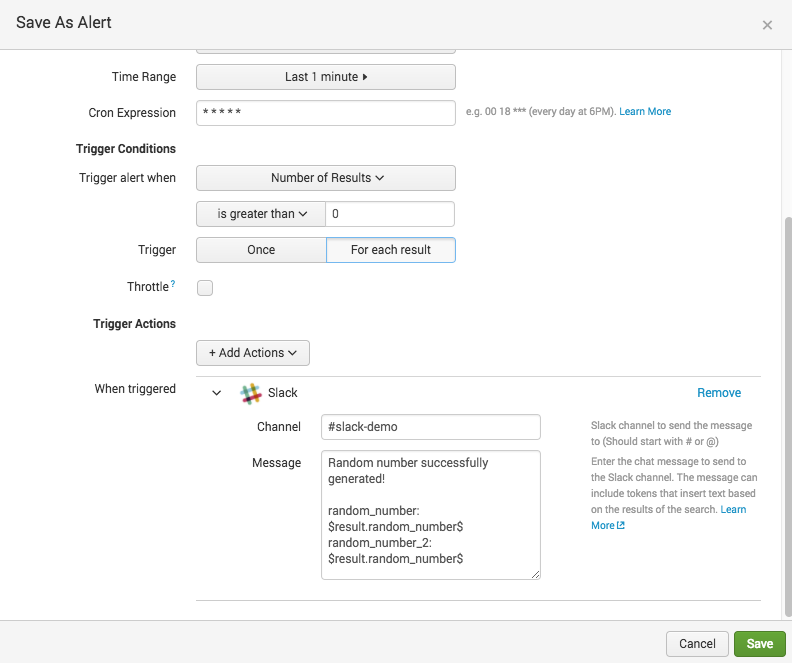
- Add a Slack trigger and use the following as the Message:
Random number successfully generated!

random_number: $result.random_number$
random_number_2: $result.random_number_2$
Inside our alert message, we can use the $result variable to get access to the fields of our event.
The alert should look like this:
- Save the alert
You should now see messages coming in like this from the alert, containing random_number and random_number_2.
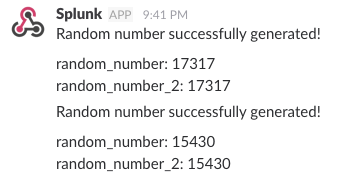
Now, let’s make it a little prettier. Slack gives you a few methods of formatting your text when sending via a webhook which you can read here.
You can see some of the options you have available in this message:
:white_check_mark: Random number successfully generated <!channel>

```
random_number: $result.random_number$
random_number_2: $result.random_number_2$
```

Search for `random_number` on *DuckDuckGo*: <https://duckduckgo.com/?q=$result.random_number$|Here>
Tip: You may want to delete this alert when you are done. The constant @channel messages are sure to get annoying :)
Example 4 - Alerting when logs are not appearing (a dead man’s switch)
Outside of the software industry, a dead man’s switch is a switch that is automatically triggered if a human operator becomes incapacitated. In Splunk, we can use the same logic to trigger an alert if we don’t see data for a period of time. This can be very useful for things like detecting if a cron job or scheduled action is meant to be taken, but isn’t for some reason.
For example, you may have a MySQL backup script that is sending a log to Splunk every time it starts and completes backing up a database. You could create an alert which says “If I don’t see a log for database backup completion in the last 24 hours, send me an alert”.
Scenario
To make this example more realistic, let’s pretend that:
- Our random number generator only runs once a day
- It starts at
01:00and we expect it to be finished by02:00.
Planning the alert
With this information, we will set the following alert properties:
- We will set a the alert to run on a cron schedule at
02:00each day - We will set the time range to and search back in the past
1 hour - If we don’t see any
Random number generator finishing.logs, we will trigger an alert
Alert creation
With our scenario setup, lets create our alert:
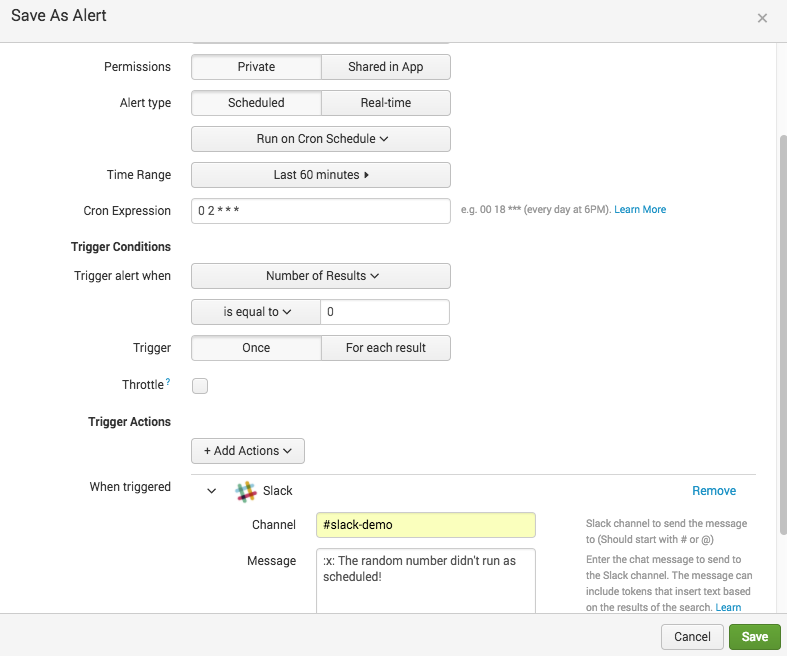
- Do a search for
Random number generator finishing.as normal and save as an Alert - Set the Time Range to
Last 60 minutes - Set the cron expression as
0 2 * * *(02:00) - Trigger an alert when the Number of results is equal to
0 - Use a Slack webhook and set the message as:
:x: The random number didn't run as scheduled!Your alert should look something like this:
Stop the random_number_generator script and wait! (If you don’t want to wait, just bring the alerts scheduled run time forward)

General tips
- I have found when using the Real-time that occasionally an alert may not be triggered if Splunk is very busy with other searches. To reduce the load on Splunk, prefer using cron or the built in time-based schedules
- Remember to scope your search query as tightly as possible on the alerts just to focus in on what you need for the alert
- Match an alerts schedule and a search time range. For example, if you have an alert checking every 5 minutes, you only need to look back at the last 5 minutes of data
You can read more alerting best practices in the Splunk documentation.
Conclusion
Splunk Alerts are a great way to get notified with rich data from your logs. There are also many Apps in SplunkBase which give you a ton of destinations to send your alert to, depending on your needs.
You can read the official documentation about Splunk Alerts here.
